Help:VisualEditor
VisualEditor (VE) is a simplified tool to edit Saintapedia that allows you see the effect of any change immediately on the page (commonly referred to as What You See Is What You Get). It does not require editors to use the Editing toolbar to learn wikitext to edit existing content.
Editing articles purely in wikitext is and will remain an option using the enhanced editor and editing toolbar. This may be the preference for experienced editors because they might find it faster and more precise. Even editors who enable VisualEditor will have the wikitext option available from the toolbar for each page and section.
VisualEditor toolbar
The VisualEditor toolbar appears at the top of the screen when you begin editing. It includes some familiar icons.
Undo and redo
You can Undo and Redo the changes you have made.
- Undo (CTRL + Z) - erases the last change done to the document reverting it to an older state
- Redo (CTRL + ⇧ Shift + Z or CTRL + Y) - reverses the undo or advances the buffer to a more current state
Headings
| Section headings |
|---|
The Headings pull-down menu: allows you to change how the paragraph is formatted. To change the style of a paragraph, put your cursor in the paragraph and select an item in this menu (you don't have to highlight any text). Section titles are formatted "Heading", and subsections are "Heading 2", "Heading 3", and so on. The normal format for text is "Paragraph".
- Paragraph (CTRL + 0) - a self-contained unit of a discourse in writing dealing with a particular point or idea
- Heading (CTRL + 2) - You should always start adding sections with level 2 sections (Headings)
- Sub-heading 1 (CTRL + 3) - the 1st section level (sub-section), under Headings
- Sub-heading 2 (CTRL + 4) - the 2nd section level (sub-section), under Sub-heading 1
- Sub-heading 3 (CTRL + 5) - the 3rd section level (sub-section), under Sub-heading 2
- Sub-heading 4 (CTRL + 6) - the 2nd section level (sub-section), under Sub-heading 3
- Preformatted (CTRL + 7) - See Enhanced editor version at Help:Formatting#Preformattedtext
- Block quote (CTRL + 9) - See Enhanced editor version at Help:Formatting#Blockquotes
- Page title (CTRL + 1) - Level 1 should not be used for Accessibility reasons
Formatting
Two formatting menu lists
Clicking the "A" opens a menu. There are two levels of formatting options.
If no text is selected when you click the "A" to open the menu, then when you select an item, that formatting will apply to the text that you start typing, from wherever your cursor is located.
Short list
This can be expanded to Full list by clicking on the word "More" or the down arrow next to it.
- The "Bold" item (B, CTRL + B) bolds the selected text.
- The "Italic" item (I, CTRL + I) italicizes the selected text.
- "Clear styling" (File:VisualEditor MediaWiki theme clear icon bitmap.png, CTRL + \ or CTRL + M) - removes all character formatting from the selected text, including links.
Full list
This can be shortened to Short list by clicking on the word "Fewer" or the up arrow next to it.
- The "Bold" item (B, CTRL + B) bolds the selected text.
- The "Italic" item (I, CTRL + I) italicizes the selected text.
- The "Superscript" item (x2, CTRL + .) causes the selected text to appear smaller than surrounding text and to be slightly higher than the surrounding text.
- The "Subscript" item (x2, CTRL + ,) causes the selected text to appear smaller than surrounding text and slightly lower than the surrounding text.
- The "Strikethrough" item (
S, CTRL + ⇧ Shift + 5) adds a solid bar through the selected text. - The "Computer code" item (CTRL + ⇧ Shift + 6) - a set of curly brackets: {}) changes the font of the selected text to a monospaced font, which sets it apart from surrounding (proportionally spaced) text.
- The "Underline" item (, CTRL + U - adds a solid line beneath the selected text (such as U)
- The "Language" item (Aあ) allows you to label the language (for example, Japanese) and direction (for example, right-to-left) of the selected text.
- Big - Increase the font size
- Small - Decreases the font size
- "Clear styling" (File:VisualEditor MediaWiki theme clear icon bitmap.png, CTRL + \ or CTRL + M) - removes all character formatting from the selected text, including links.
Linking tool
Link important words to other wiki articles or even other websites. It will help the reader understand the context. Click on the chain icon opens the linking tool and will allow you to type or search for an article to link. See the links section below for more information about the tool.
Alternatively, if you selecting some text and click on it, the link tool will populate the search with the text you selected.
The "Cite" menu is used to add inline citations (also called "footnotes" or "references"). All projects have access to "Basic" reference formatting and the ability to "Re-use" citations, using this menu. This menu also gives you quick access to local citation templates, if these are enabled on your wiki.
See #Editing references for more details.
Lists and indentation
The first two items allow you to format text as either a "Bullet list" or a "Numbered list". The last two items allow you to decrease or increase the indentation level of list items.
- Bullet list
- Numbered list
- Decrease indentation (⇧ Shift + Tab ↹ or Ctrl + [)
- Increase indentation (Tab ↹ or Ctrl + ])
See #Lists below for more details.
Insert
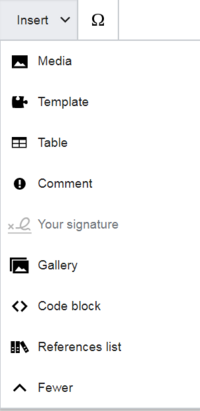
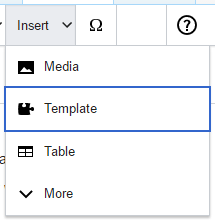
The "Insert" menu may be different on some projects. Below is a list of all options that may appear.
- The "Media" item File:VisualEditor media icon.PNG opens the media dialog.
- The "Template" item File:VisualEditor template icon.PNG allows you to edit templates.
- The "Table" item File:VisualEditor table icon.PNG allows you to insert a table.
- The "Comment" item File:VisualEditor comment icon.PNG allows you to insert comments that are not visible to readers; these comments can be seen only when in edit mode and are then indicated by an exclamation mark icon.
- Your signature
- The "Gallery" item File:Gallery icon.png allows you to insert a gallery to the page.
- Code block
- Reference list
Special character insertion
The "Special character" (Ω) item on the "Insert" menu, when clicked, displays a dialog showing many special characters. By clicking on a specific character, you place it into the text where your cursor is located. These special characters include some standard symbols, accents, and mathematical symbols. (This list may be customized locally. See VisualEditor/Special characters for instructions.)
Page options
The Page options menu is to the left of the Publish changes button. On this menu there are options to adjust page settings, such as whether the page is a redirect, or how it is indexed; to add, edit, or delete categories; and to see, using the Language item, the list of articles on the same subject that are in other languages. See #Options below for more details.
You can also switch (one-way only) from VisualEditor to the classic wikitext source editor without losing the editing work you've done.
Switch to old editor
It is possible to switch from Visual editor to the Enhanced editor with the Editing toolbar.
The editing toolbar appears above the edit/text box and functions partly as a typing aid and partly as a reminder of the available functions.
This allows editors to copy the complete contents of a page to another page, such as moving an article from a Sandbox to the Main namespace.
Editing options
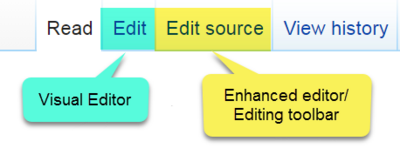
To edit a page using the visual editor, click on the "Edit" tab at the top of the page. A loading bar should appear. It may take a few seconds for the page to open for editing, and longer if the page is very long.
- You still have the option to use the classic Edit toolbar by clicking on the "Edit source" tab.
- The "View History" tab will bring you to the Article history.
- The "Read" tab is the default and will bring you out of either edit modes or back to the text from the article history
Section editing
You are able to edit individual sections with either editor:
- open VisualEditor by clicking on the "edit" link on each section
- open the Enhanced editor with Editing toolbar
Saving changes
When you're done editing, click the blue Publish changes button in the toolbar. If you have not made any changes, the button will be disabled (grayed out). To cancel all your editing changes, just close your browser window.
Publish box and edit summary
Pressing the blue "Publish changes" button opens a "Save your changes" dialog box. On that box there are a couple of options.
- In the large text box, you should enter a brief summary of your actions, mark your edit as minor, and add the page to your Watchlist. The box for the summary is the equivalent of the edit summary field in the wikitext editor.
- You can also review your changes using the "Review your changes" button to be sure they will work as intended before saving your changes. This is similar to the "Show preview" button in the Enhanced editor summary section of each page. (see below)
- The "Resume editing" button returns you to the page you were editing. You can save and publish all of your changes later.
Review your changes
On the "Review your changes" screen, you to see the results of your changes. Below the blue "Save changes" button, it is possible to toggle between the two ways, Visual or Wikitext, of viewing those changes. From this screen, you can also either:
- Save changes - The edit summary you entered, if at all, on the "Save your changes" screen will be added to your edit
- "Resume editing" button returns you to the page you were editing.
- "Return to save form" will bring you back to "Save your changes" screen"
| VisualEditor | Wikitext |
|---|---|
Resume editing
Clicking on the "Resume editing" will allow you to continue editing, while preserving any edit summary you might have already drafted. Using the Esc on your keyboard achieves the same results.
Links
Links can be added through the "Link" icon (links in a chain) in the toolbar, or by using the shortcut Ctrl + K on PC (or ⌘ + ⌘ Command + K on a Mac).
If you select (highlight) text and then press the "Link" button, that text will be used in creating the link. For a link that involves just one word, you can either select that word or just put the cursor within that word. If you select (highlight) text and then press the button, that text will be used in creating the link. For a link that involves just one word, you can either select that word or just put the cursor within that word.
Search
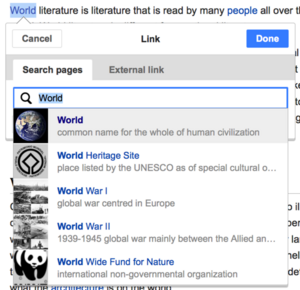
When you use either the button or the shortcut, a dialog box will open in which you may type the name of the article to link it.
Adding internal links
VisualEditor will try to help with internal links by looking for likely matches.
Once you have entered or selected the link, you complete the linking process by pressing ↵ Enter or by pressing the "Done" button. Your link will immediately appear on the VisualEditor page but, as with other changes to the page, it will not be saved until you 'Publish' the entire page.
File links
File links can be added. It is still recommended to use one of the Media templates for PDF, Word, Excel, or PowerPoint files. Unfortunately they often show up as red links in the tool, until the page saved.
Adding external links
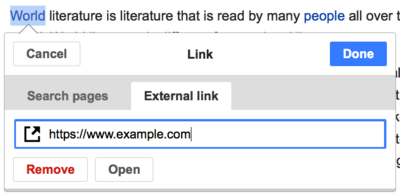
To link to an external web page on another website, the process is the similar: Choose the "External link" tab, and enter a URL in the box.
External links without labels look like this: [1]. You may add these by placing your cursor away from any word (e.g., after a space). Open the link tool by clicking on the button or pressing the shortcut keys. Type or paste the URL into the box, and click the "Done" button.
Removing link
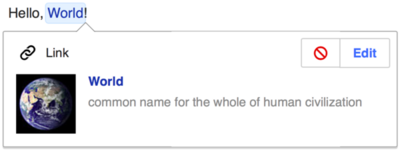
To change or remove an existing link, click within the text for that link, then press the "Link" icon that appears near it. The dialog box will appear for editing. (You may also get to the dialog with the Ctrl+K keyboard shortcut.)
In the link editing dialog, you can then change where the link goes. You can also remove the link altogether by pressing the "Remove" button in the lower left corner of the dialog. You can also open the link's target in another window by clicking on the "⧼visualeditor-linkinspector-open⧽" button. Also, you might want do this to check if an external link is valid.
References
Saintapedia's Visual Editor has the simplest of Visual editor's three footnote systems. There is a plan to upgrade to a more sophisticated system. Until that time, details on the other systems will be stored at Help:References (Visual editor).
Simplest system
The one shown on the right is the simplest system, where the "Cite" menu does not include any citation templates. If your wiki uses this system, then everything you need to know about footnotes is on this page.
Adding a new reference
To add a citation using the "Cite" menu, place your cursor where you want to add it in the text. Then select the "Basic" citation type in the menu.
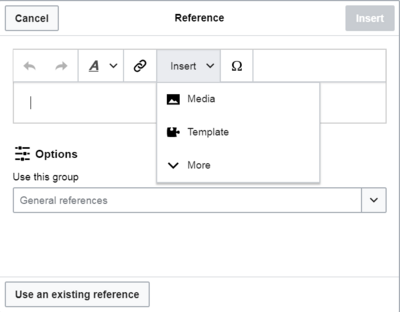
In the Reference editor, you can add your citation and there are a number of menus to help you with that process:
You can make the reference belong to a given group, although normally this is left blank. (This option is used to display groups of references with the "References list" tool.)
If you are using several groups of references, which is relatively rare, you may specify the group in this dialog. Only the references that belong to that group will be displayed on the page at the location where you are placing the group.
The final step in the References list dialog is to click "Insert".
References list
The References list allows you to specify where the references will appear on a page. By default they appear at the bottom of the page. With Enhanced editor, {{Reflist}} or {{Add refs}} were used.
If no list of references is on the page (for example, if you're adding the first reference for the page), you need to specify where the list of references, and their text, will be displayed to the reader. Place the cursor where you want to display the references list (usually at the bottom of the page), open the "Insert" menu and click the "References list" icon (three books).
Editing an existing reference
To edit an existing reference, click on it where it appears in the text (usually as a bracketed number). You will see either a "Reference" icon (bookmark) or an icon (and name) for the template that was used to create this reference. In either case, clicking on the "Edit" button will open a dialog where you can edit the reference.
For the "Reference" icon, clicking "Edit" opens the Reference dialog. To start changing the reference information, click on it. Many wikis use templates to format references. If a template is used in your reference, then when you move your pointer over the reference information, all the information in that field will be highlighted .
Re-using an existing reference
If the page already contains a citation that applies to the text you want to source, then you can choose to re-use that existing citation.
To re-use an existing reference, place your cursor in the body of the text where you want to add a new reference (number) for that citation. Then click on the "Re-use reference" item from the "Cite" menu. (Note: When Saintapedia gets the third footnote system described at Help:References (Visual editor), you'll see a "Re-use" tab, in a dialog, instead of a "Re-use" item on the "Cite" menu.)
In the Reference dialog, look at the list for the reference you want to reuse, and select it. If there are many references, you can use the search box (labeled "Search within current citations") to list only those references that include certain text.
Images and other media files
Adding an image
To add a new image (or another type of media file) to the page, click the Media item File:VisualEditor media icon.PNG icon in the "Insert" menu. The image will be added where your cursor is located.
Clicking the "Media" icon opens a dialog box that automatically searches Saintapedia for media files related to the title of the page being edited.
Change the search by changing the text in the dialog's search box.
To choose a file, click on its thumbnail image to place the image onto the page being editing.
After the image you selected is inserted into the page, another dialog will open. This dialog allows you to add and edit the caption of the image. The caption can contain formatting and links.
You can use the caption to show a label that shows next to the item for all readers. This is often used to explain why the item is relevant to the context in which it is shown. It should be succinct and informative.
The media dialog also allows you to add alternative text captions, to help users who use screen readers, or who have disabled image display.
You can use this to write a text description for people who can't see the item. The description should be enough for them to understand the purpose and information given by the media item. This is vital for blind users and other people using screen-reader software or text-only browsers.
You can also set various parameters for the image in the "Advanced settings" window. These include the alignment, the type, and size of the image.
- Position - You can set where this media item appears on the page. This is sometimes used to break up a long line of images on one side of the page.
- Wrap text around this item - You can make this media item appear inline with the text of the page instead of floating. You should only do this rarely, as it will break up the flow of the text if you uncheck this box.
- Image type - You can set how the media item appears on the page. This should be the thumbnail format to be consistent with other pages in almost all cases.
- Image size - You can set how large the media item appears on the page. This should almost always be the normal size, as a custom size will interfere with the layout of the page for readers and make it inconsistent.
When you're done, click "Apply changes" to close the dialog and return to editing the page.
For an existing image, you can add or edit a caption or other settings by clicking on the image, then clicking on the "Media" icon that appears below the picture. You can resize an existing image by clicking on it, then moving the resize icon (the two-headed arrow on one or both bottom corners).
You can also drag and drop an image to a place higher or lower on the page.
Uploading images
You can upload images from a tab in the media dialog.
Click the "Upload" tab and select an image from your computer. You can type the file name, or drag an image into the box.
Describe the image and add categories to it so that other people can find it.
The image will be inserted into the page when you are done.
Media galleries
To add a new gallery, click the "Gallery" icon (a set of photos) on the "Insert" menu. (If you don't see this icon on that menu, then your local wiki has decided to delay implementing this functionality in VisualEditor.)
To edit an existing gallery in VisualEditor, click that gallery. Then, near the bottom of the gallery, click the gallery icon (a set of photos). This brings up the gallery editor, with the full list of images included in the gallery.
The gallery editor is currently a simple box that allows you to edit existing galleries using wikitext markup. To add a new image to an existing gallery, type the file name, followed by a bar (|) and the caption for that image. You must put each image in the gallery on its own line. You can also edit this list to remove or rearrange images or to change captions.
When you click the "Done" button, you will exit the gallery editor. You should then see your changes on the gallery as it will appear to readers.
Remember that exiting the gallery editor does not publish your changes. As with other changes made using the visual editor, you must publish the entire page in order to publish your work.
Templates
Templates are wiki page in which contents can be displayed in other locations around the wiki. This allow an editor to make a change once and have the changes appear numerous places throughout the wiki.
Adding a template
To add a new template to a page, place your cursor where you want the template to be inserted, and click on the "Template" link in the "Insert" menu.
Start typing the name of the template you want to insert. When you see it on the list, click on its name. Then click "Add template."
You can also edit a template that is already on the page. When you click on the template to select it, it turns blue, and a box appears with an "Template" link. Then click on the "Edit" link.
Some templates are not visible to someone reading a page. In VisualEditor, such hidden templates are shown as puzzle icons, such as Anchor.
When you select the icon, the context menu is displayed, and you can edit the template.
Template parameters
When you add a new template or open an existing one, the "Transclusion" dialog is shown. The contents depends upon whether the template has been documented using the new TemplateData system or not.
The template shown here has no TemplateData set up for it. The dialog shows a link to documentation for the template. You can read the documentation to figure out if the template has any parameters (fields), and what goes in each field. Use numbers as the name for each nameless parameter. The first un-named parameter is named 1, the second is named 2, and so forth.
If a template has been updated to contain TemplateData![]() information, then the dialog will show a list of individual (named) parameters.
information, then the dialog will show a list of individual (named) parameters.
For an existing template, you can edit the parameters shown in the dialog, and you can add parameters by clicking "Add more information," at the very bottom of the dialog.
When a template embeds other templates, these sub-templates will appear inside the parameters that display them. They can be edited or removed inside the parameter field.
New sub-templates are added by following the steps for adding a parameter. You may need to check the template documentation to make sure that the sub-template is supported. Nested templates can currently be edited as wikitext only, without the facility offered by VisualEditor (see phab:T52182).
Finishing
When finished editing a template, click "Apply changes" to close the dialog and return to editing the main page.
Substituting templates
When a template must be substituted, type subst: (colon included) before the template's name.
Autocompletion doesn't work with subst:. If you want to use autocompletion, first find the template you are looking for, and then add subst: in front of the template name.
Then, click the green "Add template" button.
Add any parameters as usual and click "Insert".
You will see the template expand on the page after you click "Apply changes."
Lists
You can use VisualEditor to create lists, or to change the format of an existing list. There are two types of lists: unordered (bullet) and ordered (numbered).
To start a new list, just click on one of the two menu items shown here. Or, if you already have typed the list (on separate lines), select (highlight) the list you have typed, then click on one of the menu items.
Two types of bullets
Shown here are examples of the two types of lists: unordered (bullet) and ordered (numbered).
If you want to change the indentation level of part of an existing list, select the part of the list that you want to change.
Then use the menu, or press the Tab key. (The Tab key increases indentation; use the shift key plus the Tab key to decrease indentation)
Here is the result of increased indentation.
You can even mix ordered (numbered) and unordered (bullet) lists, if the list items have different indentations.
Tables

A table is an arrangement of columns and rows that organizes and positions data. You can use VisualEditor to insert and change tables. Please note, you can even import a table by dragging a comma-separated value (.csv) file from your computer into the main editing window.
Inserting a table
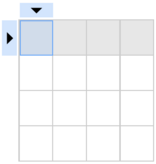
When you click on "Table", in the "Insert" menu, the visual editor inserts a blank four-by-four table.
Now the "Table" menu is available. From that menu, you can add a caption to the top of the table.
To select a cell, click it once.
Edit contents
To edit the contents of the cell (for example, to add content or to correct a spelling error), double click in the cell. Or you can select the cell and then press Return.
To end your editing of a cell, just click elsewhere.
Add or delete a column or a row
You can add or delete a column or a row by clicking on a column or a row.
For rows, you are given the options to:
- Insert above
- Insert below
For columns, you are given the options to:
- Insert before
- Insert after
Merge cells
You can merge cells: Select them and then click on "Merge cells" on the popup.
If you merge cells, only the text in one cell is kept; any text in the other cells is deleted when you merge the cells. If you decide that you wanted some or all of the text that was deleted, use the Undo button, move or copy the text you want, then merge the cells again.
Un-merge cells
You can also split cells that were previously merged. All the content that was in the merged cell will remain in the first cell when you do the split. You can then cut and paste text to other cells, if you want.
Options
The page option menu has the following options:
- Categories
- Page settings
- Advanced settings
- Languages
- Templates used
- View as right-to-left (Ctrl + ⇧ Shift + x)
- Find and replace (Ctrl + F)
When going back into the options, the setting will be show the default option even if another option is currently applied.
Categories
To edit categories, on the "Page options" menu, click the "Categories" item. Clicking on "Categories" opens a dialog that lists existing categories and allows you to add new ones, and to delete existing categories.
You also have the option of setting or changing the general (default) sorting key, which determines where the page appears when listed with other pages in the same category.
To add a category for a page, type the name of the category into the field "Add a category". As you type, the visual editor will search for possible matching, existing categories. You can either select an existing category, or you can add a category that doesn't yet have its own category page. (Until that category page is created, your new category will show as a red link after you publish all your editing changes.)
To remove an existing category, click on it and click on the "Remove" icon (trash can) in the dialog that opens.
Click "Apply changes" when you're done editing categories to return to the page editor.
Sorting key
You have the option of setting or changing the general (default) sorting key, which determines where the page appears when listed with other pages in the same category. Clicking on a category also allows you to specify a sorting key for that specific category. Such a sorting key overrides the default sorting key.
You can override how this page is sorted when displayed within a category by setting a different index to sort with instead. This is often used to make pages about people show by last name, but be named with their first name shown first.
For example, the default sorting key for the article "George Washington" is "Washington, George". In the category "Presidents of the United States", the article is listed under the letter "W", not the letter "G".
Page settings
To edit a page's settings, click to open the "Page options" menu, in the toolbar, and select the "Page settings" button. The "Page settings" button opens a dialog that shows several options.
Click "Apply changes" when you're done editing the Page options to return to the page editor.
Redirect
You can make this page into a redirect, a page which will automatically take readers to another page on this wiki. This is useful for mis-spellings and alternative names or concepts. If you do so, readers will not see the contents of this page.
You can make a page a redirect to another page by checking the "Redirect this page to" checkbox, and then typing the name of the page to which you want to send the reader who tries to go to the page that you're editing.
At the bottom is the option to prevent page renames from updating this redirect. This is very rarely used. You can prevent this redirect from being updated automatically when the page to which it redirects is moved, in the very rare case that this is needed.
Table of contents
You can change whether the page shows a Table of Contents by selecting one of these three buttons. There are three options:
- Always - show a Table of Contents regardless the number of headings, if any
- If needed (default) - shows a Table of Contents if there are three or more headings
- Never - this is the magic word
__NOTOC__(with two underscores on either side of the word)
Hiding section edit links
You can stop the edit links from appearing next to each section in the unusual case where that is appropriate. You can make a page not show edit links next to each section header by checking this checkbox.
Advanced settings
There are three things that can be changed on Advanced settings:
- Let this page be indexed by search engines
- You can force search engines to list this page in their relevant results, or force them to not do so. This option does not affect in-site search.
- Options
- Yes
- Default
- No
- Show a tab on this page to add a new section
- You can force the display of an extra tab besides the "Edit source" tab on this page which will make it easy to add a new section, or force it to not appear if it otherwise would.
- Options
- Yes
- Default
- No
- Please note that Enhanced editor will be used to add content with the "Add topic" tab
- Display title - You can override how this page's title is displayed by setting a different label to show instead. - May not be working
Languages
|
|
This is not relevant in Saintapedia at this time. It is used extensively on Wikipedia. |
Languages is a list of pages in other languages that are linked to this one. For now, it can only be edited in source mode or on Wikidata.
Templates used
Templates used is a list Templates used on the page. Each template is linked and an "edit" link is listed to the right of it.
Find and replace
Moving pages
Moving a page with VisualEditor is functionally the same as moving it using Help:Moving a page. Help:Renaming#How to rename an article is shown below for easy reference.
- Make sure you are signed into Saintapedia
- Go to the article you wish to rename
- Hover your cursor over the down arrow next to the search box
- Select Move

- Give the article its new name in the new title field

- Add the reason why you are renaming the article
- Click Move page
- Please see the final cleanup section below.
A redirect will be created pointing anyone who goes to the previous URL to the new URL for the page.
Keyboard shortcuts
Many editors are used to entering wikitext directly, especially bold, italics and wikilinks. Keyboard shortcuts allow to quickly insert similar formatting without using toolbar items. Here are the common general shortcuts in VisualEditor:
| PC shortcut | Action | Mac shortcut |
|---|---|---|
| Ctrl+B | Bold | ⌘ Cmd+B |
| Ctrl+I | Italics | ⌘ Cmd+I |
| Ctrl+K | Insert link | ⌘ Cmd+K |
| Ctrl+X | Cut | ⌘ Cmd+X |
| Ctrl+C | Copy | ⌘ Cmd+C |
| Ctrl+V | Paste | ⌘ Cmd+V |
| Ctrl+Z | Undo | ⌘ Cmd+Z |
Session timeouts
If you edit a page for 45 minutes or longer, while not making any others edits on other browser tabs, you will be timed out. To ensure that your edits are saved, there is simple solution:
- Log in on another tab
- Click try again twice
Limits
There a few limits when using VisualEditor:
- YouTube videos will show HTML of the iframe, rather than the video itself
- When Stacking items, especially templates, they will be groups together and may not be as easy to edit. In most cases,
{{Clear right}}can replace the stack templates and make it easier to edit individual items. - The alignment of certain items, such as images and infoboxes, may shift slightly after saving
- The Table of contents is not shown
