Help:How to upload new versions of files: Difference between revisions
>Tomoneill (→Steps: add note on limit) |
m (1 revision imported) |
(No difference)
| |
Revision as of 16:53, 27 August 2024
|
|
Uploading a new version of a file is a specialized form of uploading files and images. See Help:Files and Help:Images for more information about the process, requirements, and constraints of uploading documents. |
Powerpedia's underlying software allows users to upload new versions of Files and Images. This can be an extremely powerful way to keep a history of a file over time while also ensuring any pages that link to that file are automatically updated.
This page walks through the process of uploading a new file and most importantly describe, in detail, Why don't I see the new version after I upload it?.
Background on how files are stored on Powerpedia
When you upload a file into Powerpedia, an article page is created in the "File" namespace (Think of namespaces like a file drawer in a cabinet) and your file is stored there. Your file's article page can be edited like any other page in Powerpedia. You can categorize the file, add background and context about the file, add templates such as the {{Purge button}} template and more. This article page also stores a history of previous versions of the file. You can use Special:Log/upload to see a list of all recently uploaded files or even add your username to the filter to see just your uploads.
Upload a new version
Requirements
- You must be logged into Powerpedia before starting these steps.
- The file type (pdf, jpg, png, pptx, etc.) of the replacement you are planning to add must match what
- You must start the steps on
Steps
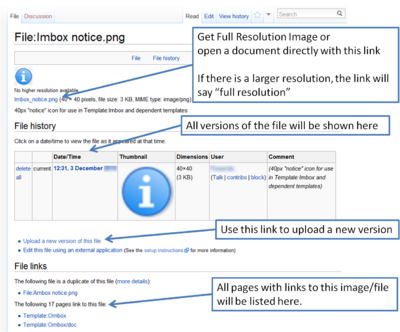
- Use the "Upload a new version of this file" link near the bottom of the file's page, under the File History section, to add a new version.
- Click on the "Browse" (on Internet Explorer browsers) or "Choose File" (on Chrome browsers). This will open a file explorer
 dialog box
 - Find the location of new version of the file
- Double click on the file or select it with a single click and then click on Open in the lower right hand corner of the dialog box
- Add information in the "File changes" box such as what changed or version date of the new file you are uploading. Please note, there is a description character limit.
- Click on "Upload file" button
The most important elements of a file page, include "Upload a new version of this file" location, are shown below. See: Help:Images and Help:Files for more information.
| "Upload a new version of this file" location | Video tutorial |
|---|---|

|
File:Powerpedia Upload a new file version.mp4 |
Additions steps - Seeing the update immediately
With time, all uploaded versions of files will be updated. As some people want to see an immediate change, there are two steps that can be taken.
Clear caches
- clear your browser cache by hitting the F5 key.
- Clear the server cache by text at the end of the URL. See Help:Purge#Basic for more information.
Adding purge button
Adding a Cache template will allow you add a button to easily see changes immediately on file pages. One of the templates, the Purge button, should look like the image on the right.
If the file does not yet have the purge button added, there are two ways to add it depending on your editor of choice.
Enhanced editor
The video tutorial below shows how to add the template to the page. The steps are:
- Edit the page
- Add the following text to the page - {{Purge button}}
- We recommend adding at the bottom of the file page
- (See Help:Purge#Adding a button for other button option)
- Save the page
Visual editor
To add Template:Purge button using Visual Editor, follow the general steps below on how to add a template to a page. No parameters are needed (see Template Data).
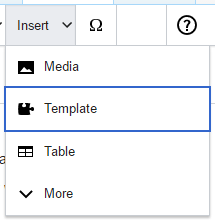
To add a new template to a page, place your cursor where you want the template to be inserted, and click on the "Template" link in the "Insert" menu.
Start typing the name of the template you want to insert. When you see it on the list, click on its name. Then click "Add template."
You can also edit a template that is already on the page. When you click on the template to select it, it turns blue, and a box appears with an "Template" link. Then click on the "Edit" link.
Some templates are not visible to someone reading a page. In VisualEditor, such hidden templates are shown as puzzle icons, such as Anchor.
When you select the icon, the context menu is displayed, and you can edit the template.
Why don't I see the new version after I upload it?
The Mediawiki software uses a server cache to improve performance. As a result, new versions of files won't immediately be displayed. To the user, it appears that the file upload did not happen correctly. In reality, the upload did complete but the software is still showing the cached version of the file or image. With time, the server cache would clear and you'd see the new version without taking any additional steps. However, the business process can't always wait.
The following two step process will clear the cache so you and others will see your new file or image immediately.
Step 1: Clear the server cache (this is called purging the page).
If you aren't already on the file page, open the image/file page and click the "UPDATE this page" link.
Notes
- If the "UPDATE this page" button is not already there, add the {{Purge button}} template to your file page and then click the "UPDATE this page" link.
- Example: this image has the purge button and this link shows how the button was added (text in red).
- See also the video tutorial above on adding the purge button.
Step 2: Clear your browser cache.
| Clear IE's browser cache by clicking the icon with the two green arrows circling each other. You can also hit F5. |
|---|
Page Loads Slowly when I have a lot of versions
When you upload many versions of a graphic file, the file page itself may load slowly because thumbnails need to be created for each and every version. A good example where this is happening is File:ES Open Items History.jpg. This problem does not occur for non-image file uploads. Where this can become a particular problem is if readers of pages that include the image click through to see it in a larger size. It's not typically a big problem for the editor who is uploading new versions because accessing this page doesn't happen everyday and a delay while it fully loads isn't the worst thing. However, there are known cases where the number of versions have gotten so long that it can cause the computer to crash.
Editors have two basic approaches they can take to ameliorate this issue. Neither are perfect.
Option 1 - add direct link to image
Add a direct link to the full image of the file so people open only the latest version in its full resolution (e.g. they don't actually go to the file page at all). This approach avoids the need for the system to generate thumbnails for all previous versions. This is the recommended approach whenever possible. You get the link below the image (look for "Full resolution"). This edit shows one way in which a direct link can be added to a page.
Option 2 - create a new file
Rather than continuing to add more versions to a single file, editors could actually upload a new file with a new name. If the file is something that is updated regularly (say weekly), a new file could be created twice a year so no single file would have more than 26 versions in it. The primary drawback to this approach is that editors need to make sure than any page linking to the image is evaluated to determine whether it too needs to change to reflect the new file name. In general, the fewer times a new file name is created the better. Again, sticking with the weekly upload example, if you can endure the load times of having 56 versions, then only create a new file once a year. The fewer times you create a new file, the less burden you will face in ensuring all the pages have correct links.
Note: At the bottom of every article in the File namespace is a section called "File links". This section shows all of the pages that have internal links to the file. You can use that section as your guide in determining which pages should be updated to point to a new version of the file.
Tools
The Purge templates make it extremely easy to purge the server cache. There are two forms of these templates. Both do the same thing, they just look a little different. We encourage the use of Template:Purge button as the primary template. See Help:Purge#Adding a button for other button options, such as


